

The only thing more personal than a custom-made frame is a custom-made frame that you have built yourself. Cyclist visits Bicycles by Design and faces new challenges.
This will be your new bike by Friday afternoon,” Pete Bird tells me as he dumps a cookie jar full of sleeves next to a stack of bare pipes. I nod hesitantly, trying to return his enthusiasm in a way that doesn't convey the fact that I'm thinking back to painful hours of handicrafts at school. However, Pete, who owns Bicycles by Design, has been teaching people how to build bicycles since Britain's first frame building course in 1993. So he quickly noticed my nervousness and found encouraging words: “I assume that you are no different than anyone else I have ever taught. The whole thing will be a challenge for you. You will sweat, curse and maybe even bleed. In the end, however, you will be able to say: 'I built that!'. And if at some point it's leaning against the wall of a café and passers-by admire your bike, then you'll be really proud. This wheel is a part of you and will be for the rest of your life. Here, these are your goggles.”

Design for life
As a beginner on a medium budget, my options for building my dream frame are limited. Stainless steel is out because it is expensive and difficult to machine. Regular steel and sleeve construction is in. During initial discussions with Pete's colleague Rob Wade I explained that I wanted to build something traditional with a modern twist and I've always wanted a Columbus SLX. After checking a supplier's catalogue, Rob suggests a Columbus Life tubing set with a sloping top tube for the modern look.
Due to the large down tube with a diameter of 35 mm and the 31,7 mm wide seat and top tube, the choice of muffs is limited to just one suitable muff set: Llewelyn P3. I also went for a design where the seat stays seamlessly merge into the seat tube sleeve, which will give the rear a slightly sleeker look. In addition, I have the opportunity to get to know another soldering technique. Let's hope that something comes out of it that at least holds the wheels.
Frame building courses are numerous and differ in many ways. What they have in common, however, is that you don't need any experience in the world of frame building - or even having been in a workshop at all - to craft a safe, bespoke and unique frame. With this reassuring knowledge, we start on Monday morning with coffee, a preliminary meeting and taking measurements.
Bicycles by Design has a room on the first floor that Rob and Pete use to measure their customers for their custom frames. This includes ones like the one I'm going to build, but also frames they build for customers. These award-winning frames are called Swallow. While I'm pedaling on a seat position analysis bike that can change the geometry on the fly, Pete bombards me with questions: “Are you pedaling while cornering? Does your weight feel evenly distributed? What geometry do you usually ride with?”.
I answer the last question confidently that I ride a 56cm frame with a 73,5° seat tube angle and 155mm head tube. So I'm surprised when Pete suggests a 57,5cm frame with a 74,5° seat angle and a 200mm head tube.
"Two hundred? Are you sure?” I ask, seeing my chances of taking an aggressive position on my future bike are dwindling. "Yep," Pete replies. This is not unusual for a sporty bike and will still give you enough leeway in 20 years when you are older and no longer as flexible. Just look at Cervélo. They have been producing long control tubes for years so that you can..."
As soon as I hear the C word, I tell Pete that he convinced me. After all the measuring, we continue on the computer. There, a draft is created using CAD software and my measurements. Large head tube or not, the whole thing looks balanced. Once the software has determined that it's UCI compliant (which is very good as I expect to see the first requests from pros to race the frame coming soon) it's off to the workshop.
Workshop idyll
The Bicycles by Design workshop is the dream image of many who retire to the country and want to live the life of a crafting hermit: sunlight floods through the open French doors, a stack of frames lies in the corner and the The Rolling Stones are on the radio. There's even a dog: Sprocket.
"Here are your tubes, braze-on cable guides, cable stops, dropouts and boots," says Pete. "The sockets are investment cast, so they are a porous material."
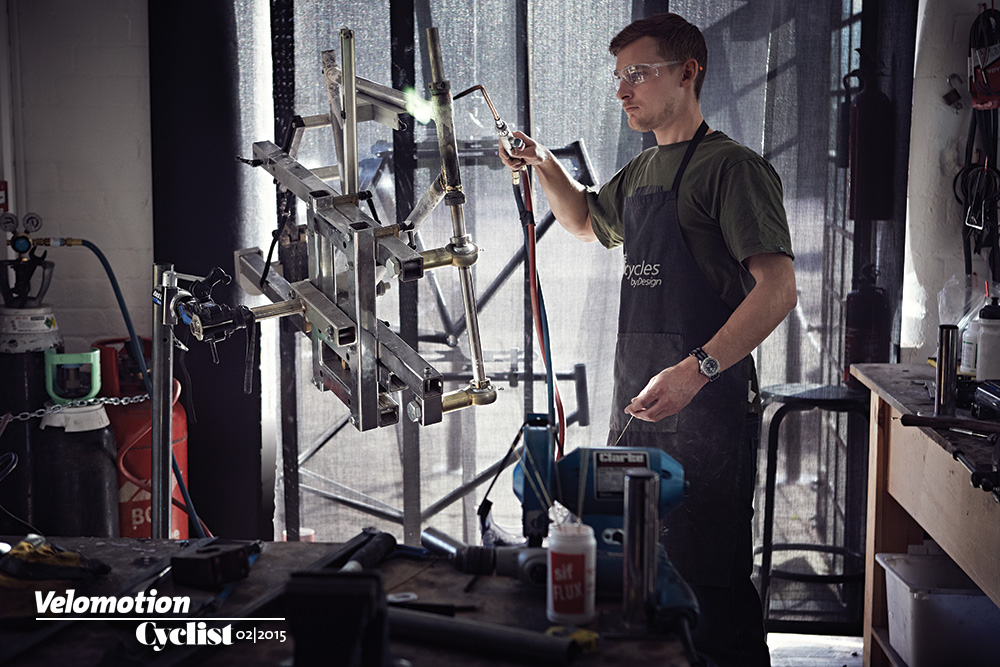
Pete explains that we will be brazing the frame. Brass solder is heated and filled into the interfaces between the pipe and the socket. The liquid solder fills the tiny holes in the sleeve, creating a strong connection. "In brazing, we heat the metal at the joint, then add the solder and let it flow into the interface," he explains. "Solder only gets into the joint using the heat of the soldering torch and capillary action."

The key is the heat. If it is too cold, the solder will not flow. If it is too hot, you risk damaging the pipe, which, unlike the thick socket, has a wall thickness of less than a millimeter. To demonstrate, Pete grabs a piece of pipe, turns on the blowtorch and points it towards the pipe. "Look for the discoloration: first it's red, then yellow, then white, then burnt. The result is a hole in the pipe. And it's quick - it wasn't more than five seconds. So we need to slowly heat the material until it reaches the desired temperature. The steel should be a faint cherry red.”
It's a nerve-racking session, but Pete seems unfazed by the look on my face and tosses the ruined piece of steel into the corner with a laugh. He explains that we're going to jump right into it and solder the seat tube to the bottom bracket shell. However, I'm actually not ready to destroy the first set of tubes worth 550 €. So I'm glad to hear that before I have to get my hands on a blowtorch, I need to mitigate the seat tube, sandblast it and apply flux.
You can find out how things are going with the frame and whether everything goes well with the soldering next week here in the blog – or in the current issue of Cyclist at the kiosk.


Leave a Comment